Cool Pumpkin
Carvings Using Templates
What
exactly are templates
Templates
are basically negative images of a design. A template
gives you the ability to easily carve mind-blowing pumpkins that will
have your friends and family in complete disbelief. Templates
can
be either something that you create yourself, purchase from a store, or
download off of the Internet. There are a few basic materials
and
tools you will need when carving pumpkins from templates.
Material
needed
- Pumpkin
(doesn’t have to be perfectly round)
- Template
- Artificial light
Tools
needed
- Ice-cream scooper, tuna
can or large spoon (for
gutting the pumpkin)
- Knife or carving saw
- Pin, nail or small poker
- Tape
Basic
template design
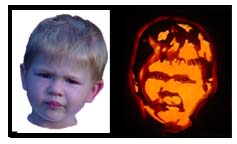
Basic
template designs are those designs that create two colors:
the orange
glow of the pumpkin
and black
(where the pumpkin
completely covers the light). With basic templates you cutout
shapes in the pumpkin that form a picture when the pumpkin is lit
up. The design can either be created by the black space on
the
pumpkin or the lighted shapes.
You can create your own templates by drawing your design on a piece
of paper or you can purchase some great designs from Pumpkin
Masters®. Pumpkin Masters® offers a great line of products
that include basic carving tools and templates. I picked up
one of their kits at my local Wal-Mart for under $4.00. The
kit came with a couple of saws, two types of punches to create
holes, a scooper, crayon and 12 patterns.
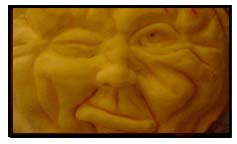
Spooky cat design
|
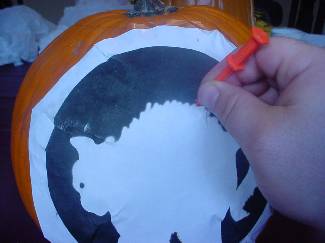
Preparing
the template
To start things off we need to get a
printout of our template. Once you have a printout you will
need to cutout a ½ to 1-inch boarder around the
design.
*
The extra space will be used to tape the pumpkin to the template.
In most cases the template will not fit
perfectly onto the pumpkin. You may need to fold creases in
the template to fit it onto the pumpkin.
Tip:
Make sure that
the folded creases do not take away from the design.
|

|
|
Outlining
the design
With a hole-punch, push pin or nail,
carefully outline the design by punching a hole through the template
and outer skin of the pumpkin.
Tip:
When punching the holes space them no farther out then 1/8 of an inch.
|
|
Click here to go to page 2
Pumpkin Carving Resources
|
|