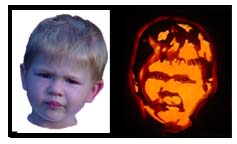
Gutting
the pumpkin
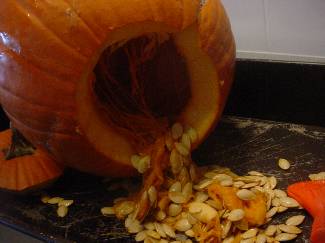 OK,
now that a lid has been created or the bottom has been removed it is
time to cleanout our pumpkin. Old ice-cream scoopers make great
scrapers to clean out the guts of the pumpkin. You can also use
other tools such as a large spoon or even a tuna can. The goal is
to scrape the insides of the pumpkin so that all of the pulp and
seeds are removed.
OK,
now that a lid has been created or the bottom has been removed it is
time to cleanout our pumpkin. Old ice-cream scoopers make great
scrapers to clean out the guts of the pumpkin. You can also use
other tools such as a large spoon or even a tuna can. The goal is
to scrape the insides of the pumpkin so that all of the pulp and
seeds are removed.
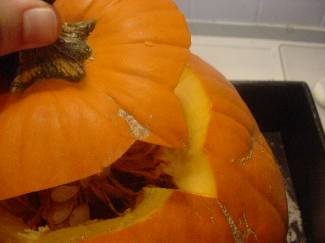
Make sure that you thoroughly clean out the insides of the pumpkin
so that there isnt any loose pulp hanging anywhere. The loose pulp
can detract from your design and become a potential fire hazard if
you are using a candle for light.
Gutting pumpkins for
templates
Now if you are going to create a pumpkin carving from a template, it
is important to make sure that the pumpkin wall is about an inch
thick where the carving is going to be. If you find parts of the
pumpkin wall that are over an inch thick, simply carve them down to
the correct thickness. Ill cover why this is important in more
detail when we go over the template carving section.
Gutting pumpkins for
Pumpkin Sculptures
You dont always need to gut a pumpkin for a pumpkin sculpture
unless your sculpture is going to have holes cut out of it or you
want to add a light to it. There are some pumpkin sculptors out
there that never gut their pumpkins. My personal opinion is that
adding a light to the inside of a pumpkin sculpture adds a whole new
effect so I always gut mine.
Creating a flat surface for the light
If you decide to create a lid instead of cutting out the bottom of
the pumpkin, you will want to scrape the bottom of the pumpkin so
that it is flat. This will allow you to be able to put your light
source, whether it is a candle of some other form of artificial
light, on a safe and secure surface.
Tying it all together
The first step to pumpkin carving is to setup our work area.
Carving pumpkins is messy so you will want to either lay down a
bunch of newspapers or an old towel before you begin.
Once the work area has been setup it is time to create either a lid
for the pumpkin or to cutout the bottom of the pumpkin. A lid or
removing the bottom is necessary so that you can gut the pumpkin.
If you do decide to use a lid, cut a small notch in the back of it
so that it is easy to put back onto the pumpkin.
When you gut a pumpkin for a template you will want the wall where
the carving is going to go to be an inch thick. If some areas a
greater then an inch, simply scrape the inner wall down to the
correct thickness.
As for pumpkin sculptures, whether or not you gut the pumpkin is
completely up to you and the design you plan to use.
Cool Pumpkins
 |
|
If
you have
found the tutorials on this site beneficial then I would like to
introduce you to Cool Pumpkins. Cool Pumpkins is an e-book
that contains the tutorials from this site plus other great pumpkin
carving tips and tricks. With over 100 pages of text and
images
you will get step-by-step instructions on how to create some of the
most amazing pumpkins you have ever seen. I have also
included 20
FREE templates to get you
started on some basic pumpkin carving
designs. Your investment in Cool Pumpkins not only helps
support
this site but also gives you over 100 pages of great tips and tricks to
carving amazing looking pumpkins.
Cool
Pumpkins is normally priced at $15.95
but for a limited time I am offering it for $5.95
(over 60% savings).
The Cool Pumpkins e-book is a 4.2 Meg pdf e-book that is available at
the following link:
Click here to order
Cool Pumpkins! |


 Ok,
now that the work area is setup it is time to get down to business.
We need to clean the inside of the pumpkin out before we begin
carving. To do this we will need to start off by either cutting a
lid into the pumpkin or cutting the bottom out of the pumpkin.
Whether you make a lid or remove the bottom is up to you.
Ok,
now that the work area is setup it is time to get down to business.
We need to clean the inside of the pumpkin out before we begin
carving. To do this we will need to start off by either cutting a
lid into the pumpkin or cutting the bottom out of the pumpkin.
Whether you make a lid or remove the bottom is up to you.