Pumpkin Portraits - Page 2

The template 

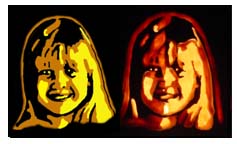
The first step is to select your template and resize it to the size that best fits the pumpkin. 

I have left my template black, orange and yellow for this example.  Most templates will be black, grey and white. 

Tip:  I will show you how to create your own templates in the next section.


Cut a half-inch to inch around the template and tape it to the pumpkin.  The template at times can be challenging to tape on straight so you will need to take your time when attaching it to your pumpkin. 

The Black areas on my template are going to be left alone.  The Yellow areas are going to be cutout and the Orange areas will be cut down or shaved 50 percent.

Transferring the image to the pumpkin

 I then take my punch tool and carefully punch through the template and outer skin of the pumpkin.  I keep my holes about 1/8 or less of an inch apart.

Here is what the template looks like after I have outlined my design with the hole-punch.   

 Make sure that every part of the design has been outlined.

This is what my punch tool looks like.  I got my punch from a Pumpkin Masters kit that I picked up at Wal-Mart. 

 You can also use a nail, straight pin, or any other sharp object that can make a small hole.

Continued on Page 3 of 4

Pumpkin Carving Resources


Menu

 Pumpkins (home)

 Pumpkin Carving Tips

 Pumpkin Templates

 Pumpkin Portraits

 Pumpkin Sculpting

 My Pumpkins

 Pumpkin Carving Tools

 Pumpkin FAQ

 Costumes and More

Pumpkins


Cool Pumpkins (Home) | SiteMap |Affiliate Program | Privacy  | Blog | Links
 Contact Us

Copyright © 2006
Gerald Gore Studios All rights reserved.
All product and brand names mentioned on this web site are trademarks of their respective owners.