Pumpkin
Sculptures - Page 2
Picking out the
right pumpkin
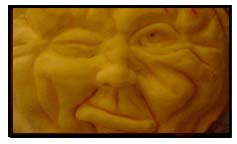
The key for
creating sculptures out of pumpkins is to find pumpkins that have
very thick walls. The thicker the walls the farther down you can
carve to create a very impressive three-dimensional work of art.
Pumpkins that are perfectly round
usually have walls that are too thin for pumpkin sculpting. The
lopsided, or egg shaped, pumpkins are really the ones that you want
to look for. Nine times out of ten you will find that the lopsided
pumpkins usually have one wall that is thicker then the others.
I also look for pumpkins that appear to
be heavy for their size. The heavier pumpkins usually have thicker
walls that contribute to the extra weight. Basically what I will do
is pick up a few pumpkins that are around the same size and pick out
the one that is the heaviest.
These are the key rules that I use to
pick out my pumpkins and so far they have worked very well for me.
Just remember that the thicker the pumpkin wall the more depth you
can create for the sculpture resulting in a more impressive work of
art.
Gutting the pumpkin
Gutting a
pumpkin is not always necessary for pumpkin sculptures and there are
some sculptors out there that do not gut their pumpkins at all. It
really comes down to personal preference and whether or not you want
a pumpkin that you can light up at night. I personally prefer to
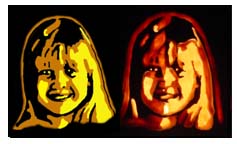
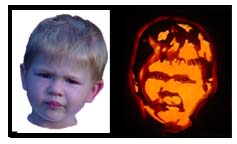
gut my pumpkins but thats just me. The sculptures themselves are
impressive alone and illuminating them is just another effect that
you can add. Whatever you choose to do, just go out, have fun and
create some cool looking art!
Some key points before we begin
When I create a sculpture I purposely
jump around by working on several key areas at the same time. I
believe it is counterproductive to focus on one area of the
sculpture until completion. Lets use the nose as an example. If
you focus completely on the nose you may overlook how the eyes and
cheeks and mouth should look with your nose. By moving around
between the nose, eyes and mouth, you focus on the artwork as a
whole instead of just the individual parts. I personally find it
easier this way to create balance between the different parts of the
sculpture.
Shaving the Face
OK, so by
now we should have picked out a pumpkin that we want to turn into a
cool looking sculpture. The first step is to identify where on the
pumpkin that we are going to do the carving. If you have decided to
gut your pumpkin then you can easily identify the area that has the
thickest wall. Otherwise will need to make an educated guess on
which part of the pumpkin has the thickest wall.
|
Clearing the surface
Using your
large loop tool scrape away the outer skin of the pumpkin.
Tip:
Not as easy as one would think but with a little practice you
will be able to shave the pumpkin with great ease.
|
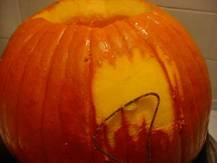 |
Shaved and ready to go
You only
need to scrape the area that you are going to carve.
Here is a picture of what my pumpkin looks like after I have
shaved the skin off of my carving area.
*Takes
me about 5 minutes to get to this stage. |
 |
Now that
our pumpkin has been shaved, lets see what cool designs we can come
up with!
Continued on
Page 3
Pumpkin Carving Resources
|